


The topics in this chapter include:
To learn more about how to activate the browser, refer to:
For more information on browser settings and options, see "Setting Browser Options" on page 241.
To learn how to use contextual menus in the browser, see "Browser Contextual Menu" on page 211.
There are three principal ways of looking at the information available to you in the browser:
The browser also implements instant access to information. By right-clicking (Windows) or clicking and holding the mouse (Mac OS, Solaris, and Linux) on any symbol for which there is information in the database, you get instant access to related source code. "Browser Contextual Menu" on page 211 discusses this feature.
Within the browser and hierarchy views, you can look at multiple classes or single classes. Table 7.1 summarizes the various major choices you have when using the browser.
|
Viewing Style
|
Wide Focus
|
Narrow Focus
|
|---|---|---|
The browser-related menu commands in the Window Menu-Browser Contents, Class Hierarchy Window, and New Class Browser-display wide-focus views. Once you have the wide view, you can focus on a particular class.
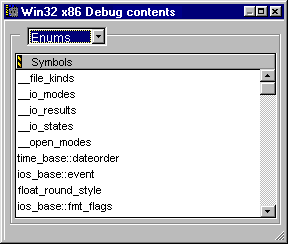
The Contents view lets you see all of your data sorted by category into alphabetical lists. Figure 7.1 shows a Contents view.
See "Contents Window" on page 213 for details on the Contents window interface.
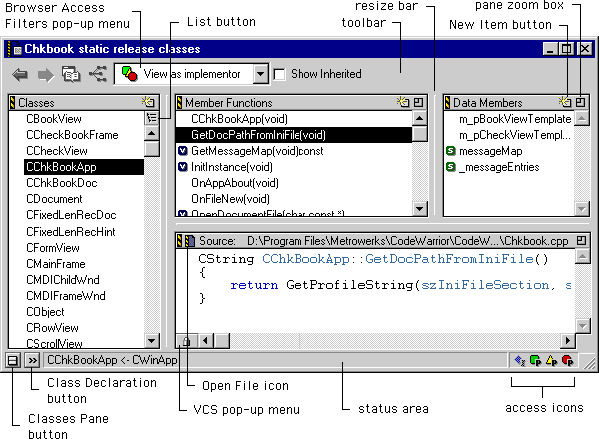
The Browser view is like a traditional class browser. You use this view to look at your data from a class-oriented perspective. Figure 7.2 shows what a Browser view looks like.
See "Browser Window" on page 214 for details on the user interface elements in the Browser view.
 NOTE
NOTE
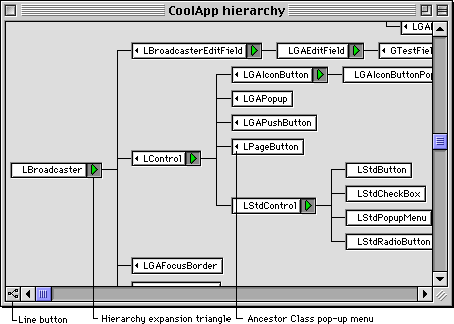
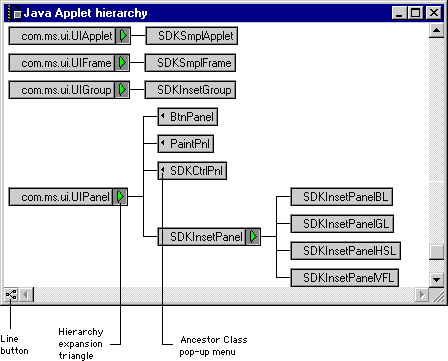
The Hierarchy view is a graphical view of your class hierarchy. You use this view to understand or follow class relationships. Figure 7.3 illustrates a multi-class hierarchy view for some classes.
See "Multi-Class Hierarchy Window" on page 221 and "Single-Class Hierarchy Window" on page 223 for details on the Hierarchy view interface.
This section examines each window used by the browser and the browser controls. The sections are:
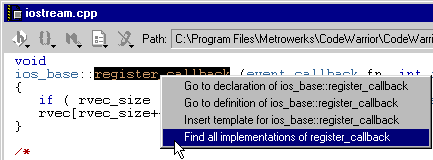
For example, if you select class name and use the browser contextual menu, you can open the class declaration, a Browser Window, or a Single-Class Hierarchy Window. If you use the contextual menu for a routine name, you get different choices, as shown in Figure 7.4.
You can even insert a routine template at the location if you wish. See "Browser Display" on page 268 for more information.
Other menus for other kinds of symbols have similar commands.
 TIP
TIP
 TIP
TIP
Of particular note in the contextual menu for routine names is the Find all implementations of command. When you choose this command for a routine that has multiple definitions, a Symbol Window opens in the browser.
The Contents window displays browser data sorted by category into alphabetical lists. Choose Browser Contents from the Window Menu to display the Contents window, shown in Figure 7.5.
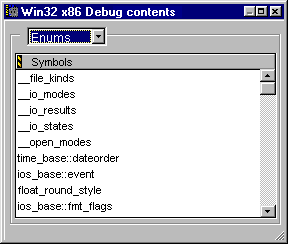
The Category pop-up menu select the type of information displayed in the Symbols pane. The currently selected item is highlighted (Windows) or checked (Mac OS, Solaris, and Linux).
 NOTE
NOTE
The Browser window (Figure 7.2 on page 209) gives you a class-based view of the information in the browser database. The window has several panes displaying lists of information.
You can open Browser window using several techniques:
from the Window Menu.
 TIP
TIP
The Classes pane, Member Functions pane, and Data Members pane are lists of their respective data. Clicking within a particular pane makes it the active pane. You can also use the Tab key to rotate through all the panes (except for the Source pane).
 TIP
TIP
Use the mouse to select a different pane.
Use the Control-Tab key combination to cycle through list items alphabetically.
The items in this window include:
The toolbar provides easy single-click access to many CodeWarrior commands. The buttons that are displayed in the Browser window's toolbar are listed in Table 7.2.
|
Button
|
Description
|
|---|---|
The Browser Access Filters pop-up menu controls the display of member functions and data members in the Browser view. The pop-up menu's commands "filter" the display according to public, private, and protected access types. A mark is displayed next to each enabled filter. The available choices in the pop-up menu are described in Table 7.3.
After you enable a particular filter, the access icons change in the bottom-right corner of the Browser window. Darkened icons, as shown in Table 7.3, indicate enabled filters. Grayed-out icons represent disabled filters.
|
Command
|
Access Icon
|
Show items with
|
|---|---|---|
The pane zoom box enlarges and shrinks panes in the browser.
 Click this box to enlarge a pane to fill the Browser window.
 Click this box to shrink a pane to its original size.
A resize bar is located between each pair of panes, as illustrated in Figure 7.2 on page 209. To resize two panes, drag the resize bar located between them.
 TIP
TIP
The Classes pane lists all the classes in the browser database.
You can view the list alphabetically or by class hierarchy. Toggle the view by clicking the List button at the top right of the pane, as shown in Figure 7.2 on page 209.
In the Hierarchy view, hierarchy expansion triangles are displayed next to class names that have subclasses, as shown in Figure 7.3 on page 210. Click the expansion triangle to show or hide subclasses.
 TIP
TIP
When you select a class in the Classes pane, the Multi-Class Hierarchy Window selection changes too. The Hierarchy view scrolls to the newly selected class if necessary.
 NOTE
NOTE
The List button at the top right of the Classes pane controls the listing of classes. You can toggle between an alphabetical list or a hierarchical list.
 Click this button to switch to an alphabetical list.
 Click this button to switch to a hierarchical list.
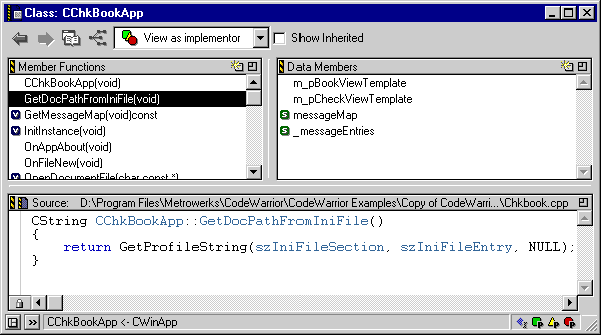
The Classes Pane button at the bottom left of the Browser window controls the display of the Classes pane.
 Click this button to hide the Classes pane (Figure 7.6).
 Click this button to display the Classes pane (Figure 7.2).
After you click the Class Declaration button, the Source pane shows the declaration of the current class. This class is shown in the Status area of the Browser window.
 TIP
TIP
 TIP
TIP
|
Icon
|
Meaning
|
The member is
|
|---|---|---|
 NOTE
NOTE
 This pop-up menu lets you use revision control with the source file you are viewing. To learn more about how to use this feature, refer to the discussion in "Common VCS Operations" on page 593.
The Multi-Class Hierarchy window displays a complete graphical map of the classes in the browser database. Each class name is displayed in a box, and related classes are connected to each other by lines. Choose Class Hierarchy Window from the Window Menu to display the Multi-Class Hierarchy window. Figure 7.7 shows the Multi-Class Hierarchy window.
 TIP
TIP
If you double-click a class entry, or select the entry and press the Enter/Return key, you open a Browser Window for that class.
In addition to the entry for each class, the Multi-Class Hierarchy window has three items:
The hierarchy expansion triangle controls the display of subclasses.
 NOTE
NOTE
Click on the Ancestor Class triangle, shown in Figure 7.7, to display a pop-up menu. This menu lists immediate ancestors. When you choose an item from the pop-up menu, you jump to that class in the map. If the item is not currently visible, the computer beeps.
This control is displayed only for classes that have multiple base classes.
The Single-Class Hierarchy window displays a complete graphical map for a single class in the browser database. The map displays all immediate ancestors of the class, and all of its descendants. (The Multi-Class Hierarchy Window only shows one base class.)
Figure 7.8 shows the Single-Class Hierarchy window, displaying multiple base classes and subclasses. The underlined class name is the focus of the window.
You can open a single class hierarchy view using several techniques:
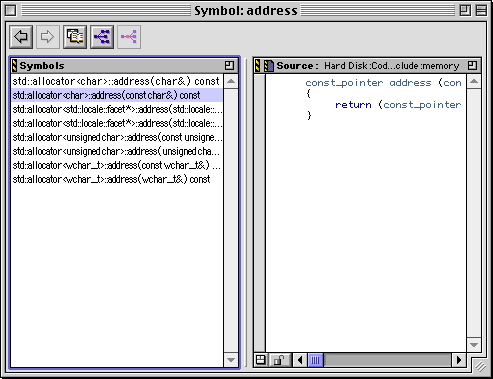
After selecting an implementation in the Symbol window list, you see its definition in the Source pane. Figure 7.9 on page 225 shows the Symbol window.
You open a Symbol window by right-clicking (Windows) or clicking and holding (Mac OS, Solaris, and Linux) on a symbol name in any browser or editor window for which there is information in the browser database. When you do, a Browser Contextual Menu is displayed. If the item has multiple implementations, choose Find all implementations of. When you choose that item, the Symbol window displays.
 TIP
TIP
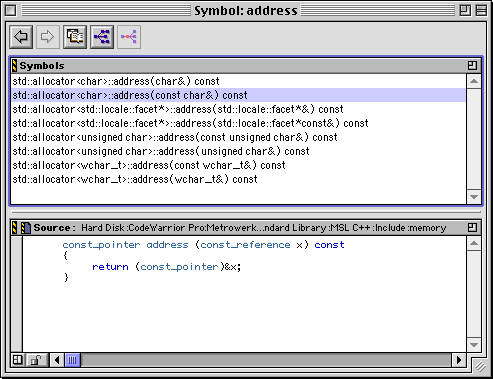
Most of the items in this window are identical to the Browser Window. For a discussion of the window in general, see "Browser Window" on page 214. That topic includes discussion of these items, also found in the Symbol window:
The Symbol window also has two unique items: the Symbols pane and the Orientation button.The Symbols pane has the focus outline in Figure 7.9. This pane lists all versions of a symbol in the database. When you select an item in the Symbols pane, that item's definition is displayed in the Source pane.
The Orientation button toggles the position of the Symbols pane and the Source pane. The position toggles between Figure 7.9 and Figure 7.10.
When a Contents View, Browser View, or Hierarchy View is visible, the Browser menu is displayed in CodeWarrior's menu bar. You use the commands in this menu to create new items. The IDE opens a wizard based on the command you select. The wizard presents various options to help you create a new class, member function, or data member.
The following list describes the commands in the Browser menu:
New Class-opens the New Class Wizard to help you create a new class. The wizard lets you specify the name, location, file type, and modifiers for the new class.
New Member Function-opens the New Member Function Wizard to help you create a new member function for a selected class. The wizard lets you specify the name, return type, parameters, modifiers, and other optional information for the new member function.
New Data Member-opens a the New Data Member Wizard to help you create a new data member for a selected class. The wizard lets you specify the name, type, initializer, modifiers, and other optional information for the new data member.
The Browser wizards include the following navigation buttons:
The New Class wizard is divided into the following steps:
1. Describe the name and location for the new class.
2. Specify base classes and methods for the new class.
3. List #include files for the new class.
4. Assign the new class to the project's build targets.
To use the New Class wizard, follow these steps:
1. Describe the name and location for the new class.
This section of the wizard, shown in Figure 7.11, lets you specify the name, declaration, and location for the new class. Other options are available to further describe the class.
This section includes the following parts:
Enter a name for the class in this field.
This pop-up menu lets you specify the type of declaration file:
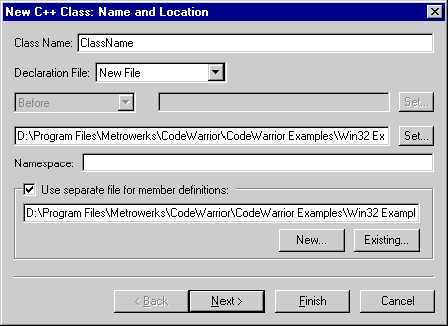
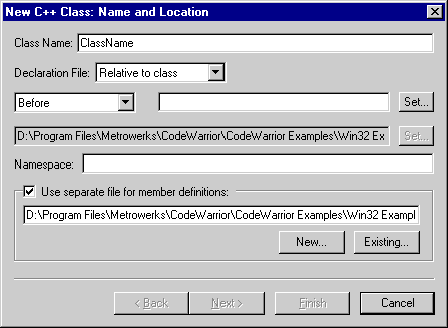
Depending on the option you choose, different fields become enabled below the Declaration File pop-up menu. The enabled fields for the New File option are shown in Figure 7.11, and the enabled fields for the Relative to class option are shown in Figure 7.12.
If you choose the Relative to class option, the pop-up menu and the class field beside it become enabled, as shown in Figure 7.12. In the class field, type the name of the class you want to relate to the new class. Alternatively, click Set next to the class field, select a class in the window that opens, and then click Select. Next, use the pop-up menu to place the new class Before or After the class in the class field.
In this field, type a namespace for the new class. Each name in the namespace should be unique.
2. Specify base classes and methods for the new class.
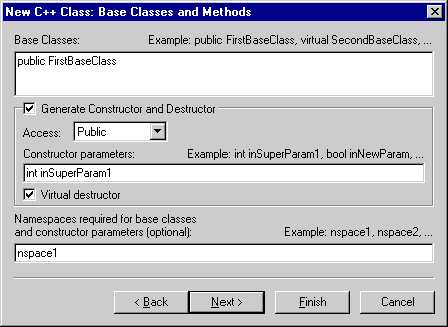
This section of the wizard, shown in Figure 7.13, lets you define base class, methods, and additional information for the new class.
This section includes the following parts:
If you wish, you can enter in this field required namespaces for the base classes from the Base Classes field and the constructor parameters in the Generate Constructor and Destructor part of the wizard.
3. List #include files for the new class.
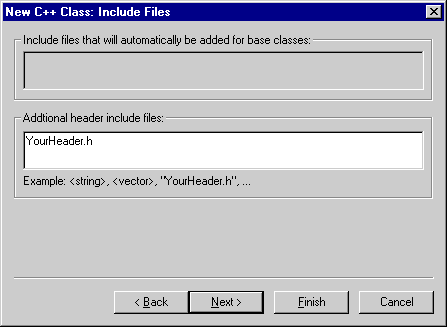
This section of the wizard, shown in Figure 7.14, lets you specify additional header #include files for the new class.
This section includes the following parts:
This field shows you a list of #include files that will be automatically added to the base classes.
4. Assign the new class to the project's build targets.
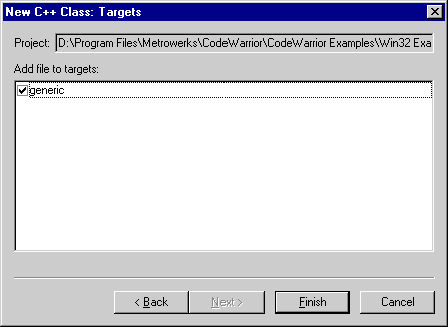
This section of the wizard, shown in Figure 7.15, lets you assign the new class to particular build targets within the active project.
This section includes the following parts:
This field shows you the path to the project whose build targets are listed in the next field.
To assign the class to a specific build target, enable the checkbox next to the build target's name in this list. For example, in Figure 7.15, the new class is assigned to the generic build target.
The New Member Function wizard is divided into the following steps:
1. Describe the declaration of the new member function.
2. Specify file locations for the new member function.
To use the New Member Function wizard, follow these steps:
1. Describe the declaration of the new member function.
This section of the wizard, shown in Figure 7.16, lets you specify the name, return type, and parameters for the new member function. Other options are available to further describe the function.
This section includes the following parts:
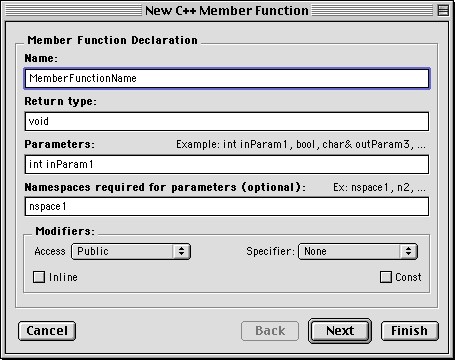
Type a name for the member function in this field.
Enter an appropriate function return type in this field.
If desired, enter a list of namespaces required for the parameters in the Namespaces required for parameters (optional) field. Sample parameters are listed above the field.
2. Specify file locations for the new member function.
This section of the wizard, shown in Figure 7.17, lets you specify file locations associated with the new member function.
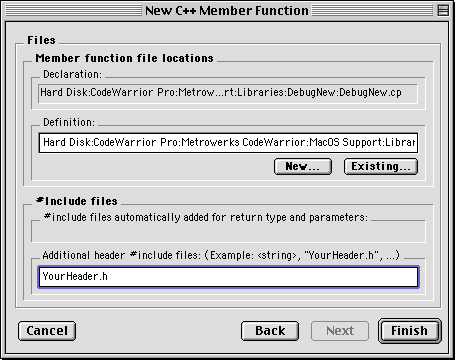
This section includes the following parts:
The New Data Member wizard is divided into the following steps:
1. Describe the declaration of the new data member.
2. Specify file locations for the new data member.
To use the New Data Member wizard, follow these steps:
1. Describe the declaration of the new data member.
This section of the wizard, shown in Figure 7.16, lets you specify the name, type, and initializer for the new data member. Other options are available to further describe the data member.
This section includes the following parts:
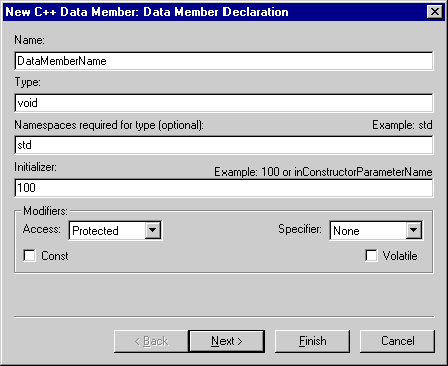
Type a name for the data member in this field.
Enter an appropriate data-member type in this field.
If desired, enter a list of namespaces required for the type in the Type field. Sample parameters are listed above the field.
2. Specify file locations for the new data member.
This section of the wizard, shown in Figure 7.19, lets you specify file locations associated with the new member function.
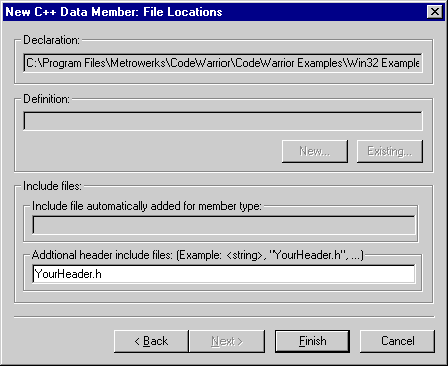
This section includes the following parts:
This field shows you the location of the file to which the data member's declaration will be added.
This field is not available in this wizard.
This field shows you the #include file that is automatically added for the data-member type.
Topics in this section include:
Browser-related menu items and browser-specific options become available when you activate the browser. See "Activating the Browser" on page 205 for information on how to enable the browser.
When the browser is enabled for your project, browser-related menu commands are enabled. These items include the Browser Contents, Class Hierarchy Window, and New Class Browser commands in the Window Menu.
 TIP
TIP
In addition, there are global IDE options that relate to the browser. You control how various items are colored in browser windows, and the time delay before the Browser Contextual Menu is displayed (Mac OS, Solaris, and Linux).
To tell the IDE to include items from a project's subprojects in its browser windows, see "Cache Subprojects" on page 331.
To learn how to modify these settings, see "Browser Display" on page 268 or "Context popup delay" on page 272.
There is an easy way to know whether or not a symbol is in the browser database without checking to see if a Browser Contextual Menu displays: use browser coloring. If the browser is activated, symbols that are in the browser database are displayed in editor and browser windows according to the colors you select. See "Browser Display" on page 268 for more information.
 TIP
TIP
There are many ways to move around in code with the browser.
Perhaps most powerful and flexible way to navigate code is to use the Browser Contextual Menu. You see this menu when you right-click (Windows) or click and hold (Mac OS, Solaris, and Linux) on any symbol for which there is data in the browser database. This includes class names, routine names, global variables, class data members, and much more. To learn more, refer to "Browser Contextual Menu" on page 211.
In the Browser Window, simply selecting a class, routine, or data member displays the associated code in the window's Source pane.
The browser fully supports the Go Back and Go Forward commands in the Search Menu. Regardless of the views, windows, or code you have looked at, you can always go back to what you were viewing earlier.
These commands allow you to go backward or forward through a series of changes you made. For example, suppose you use the browser to look at your project and make changes to a file. Then, you switch files and make more changes. You may do this many times. You can use the Go Back command to go back one or more actions you have performed. Even if you did not make any changes to the file, but looked at it (or a specific class or method), you can go back to that action. Similarly, once you have gone back, you can use the Go Forward command to return to where you started.
When you add the Go Back and Go Forward commands to a CodeWarrior toolbar, you can use their associated pop-up menus, as shown in Figure 7.20. Click and hold on the Go Back or Go Forward toolbar icons to display the pop-up menu.
 NOTE
NOTE
Go Back and Go Forward do not undo any actions you performed. They allow for a more flexible method of moving around to specific places you have been in the Browser window.
The IDE normally only displays browser items for the current build target. To include browser information from the subprojects of the current build target, enable subproject caching. For more information, see "Cache Subprojects" on page 331.
The IDE has commands to complete your typing for you when you enter the name of an item for which the browser has information. Use the Find symbols with prefix, Find symbols with substring, Get next symbol, and Get previous symbol keyboard commands to find and choose browser items that match the text you have selected or just entered in a source code file. These commands are only available from the keyboard. They are not available in the IDE's menus. See "Editor Commands" on page 651 for a description of these keyboard commands.
Another way to find and enter a browser item is to select the first few characters of some text and then right-click (Windows) or click and hold (Mac OS, Solaris, and Linux) on the selection. The Browser contextual menu displays a list of matching items, as shown in Figure 7.21. Choose one of these items to automatically replace the selected text. See "Browser Contextual Menu" on page 211 for more information.

There are some quick methods you can use to open a source file.
In the Browser Window, click the Open File icon when portions of the file you wish to see are displayed in the window's Source pane. See "Open File icon" on page 221 for more information.
To select a file, click on a symbol used in that file. Then use the Browser Contextual Menu to open the desired file or see a particular routine.
If you select a class name or data member name in a Browser Window, and the declaration is shown in the Source pane, double-click the name to open the file that contains the declaration. (If you select or double-click a routine name, you see the definition).
If you click the Class Declaration button in the Browser window, you see a class declaration in the Source pane.
When you right-click (Windows) or click and hold (Mac OS, Solaris, and Linux) on a name in any window, use the Browser Contextual Menu to open the declaration. This technique lets you see a routine declaration.
There are several methods you can use to see a routine definition:
Any code visible in a Source pane is fully editable. Locate the definition with which you wish to work. When the code is displayed in the Source pane, use the same techniques you learned in the editor window to edit your code.
For more information about the CodeWarrior editor, see "Editing Source Code" on page 133.
Use the Multi-Class Hierarchy Window or the Single-Class Hierarchy Window to analyze inheritance in your source code. Look for the small triangle to the left of a class name, as shown in Figure 7.7. This triangle indicates that the class has multiple ancestors. Use the associated Ancestor Class pop-up menu to jump to any ancestor class to study its descendants (or ancestors). Use the Hierarchy expansion triangle to expose or conceal subclasses.
For more information, see "Multi-Class Hierarchy Window" on page 221.
Use the Browser Window to find functions that are overrides. To find these overrides, disable the Show Inherited checkbox in the Browser Window toolbar. Disabling the checkbox disables the display of unchanged inherited functions. However, it does not disable functions you have overridden.
Next, look for functions that are marked as virtual with an Identifier icon. Most of these functions are likely to be overrides of inherited functions, although some could be functions you declared in the class that were not inherited from an ancestor.
To open a Symbol Window for any routine with multiple definitions, right-click (Windows) or click and hold (Mac OS, Solaris, and Linux) on a routine name, and then choose Find all implementations of. Combined with a Hierarchy view, you see precisely who overrides the routine, and where the routines are found in the class hierarchy.
First, set up a browser window to your liking. For example, set the size of each pane in the Browser window, and the size and location of the window itself. Then choose Save Default Window from the Window Menu. The next time you open a Browser window, it takes on the attributes you saved.
To learn about saving editor windows, see "Saving Editor Window Settings" on page 144..


